
Although I have provided lots of sensory activities, such as sand and rice, with gutters and tubes connecting trays at different levels, I hadn’t even considered dividing the play area until I stumbled across the inspiring blog of tomsensori tomsensori.blogspot.com Once I saw his ideas I had to try them.

There are lots of learning opportunities that can be gained by using these dividers. Tomsensori describes the individual play areas created and the opportunities for developing small motor actions such as scooping and pouring through the shaped holes and tubes and coordinating actions when the child can’t necessarily see where they are pouring. With older children I think the dividers also provide the potential for working cooperatively together as the sand is moved from one section to another.
What you need:
- cardboard boxes (I used estate agent’s for sale board which I sourced from my local materials bank)
- strong tape
- craft knife
- carpet roll tube or similar (not essential)
What you do:
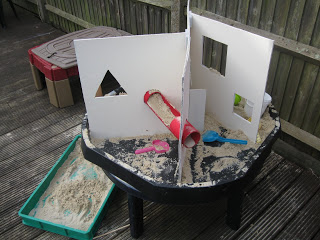
Cut the cardboard into pieces that will fit in your tray when put together (I’ve used 3 pieces in mine). Cut slots into the cardboard so you can intersect the pieces together. I cut out two long slots in the intersecting pieces and two small slots in the main piece. The craft knife I purchased from my local Poundland store did the job a treat.

I cut mine so one piece of board fitted at a right-angle to the main piece (the largest piece in the photo) and the other piece fitted at a slight angle. I then fitted mine altogether, stood it in the tray and roughly drew where I wanted to cut the shape holes. I cut only squares and triangles as these were easier than circles and didn’t fully cut out two of the squares so that they formed flaps that could be lifted. I took the whole thing apart before cutting these out. You can tape the holes around the edges to make them stronger. I then cut the tube to the length that I wanted it and cut a section out, so that the children could move the materials along the tube. This was a little bit more tricky to fit. There is probably a correct way of working out where you needed to cut the holes but I basically cut two holes and cut pieces out of these until I could get the tube to fit between the two. I then painted the whole thing, though this isn’t strictly necessary, I just like things to look nice! I also glued some small squares of cardboard to the top of the main board to slot the 2 intersecting pieces into, just to make the whole thing a bit more sturdy. I’d say the whole thing took me no more than a couple of hours to do.
But what did the children think of it…..


Yep, think they liked it! ………..well until they saw my husband repairing the block paving and decided they would rather use the sand to imitate this.


